Set up a wireless microphone system by preparing the receiver and microphone, choosing a compatible frequency, connecting the audio output, and testing the sound in the places you will use it. This guide is for beginners preparing a handheld, headset, or lavalier microphone for a meeting, performance, presentation, or event. Allow 30-60 minutes, including time to check for interference and adjust audio levels.

Get audio and creator gear delivered free with Prime
- Fast, free delivery on millions of items
- Prime Video, Amazon Music and more included
- Member-only deals all year

Phenyx Pro PTU-7000-4H 4-Channel UHF Wireless Microphone System
- ✔ Channels: 4
- ✔ Selectable frequencies: 40 per channel; 160 total
- ✔ Frequency range: 530–580 MHz

Phenyx Pro PTU-71-2H Dual UHF Wireless Handheld Microphone System
- ✔ Channels: 2
- ✔ Microphones: 2 handheld dynamic
- ✔ Selectable frequencies: 100 per channel
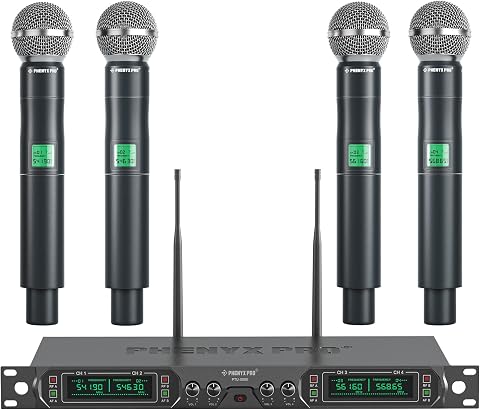
Phenyx Pro PTU-5000-4H 4-Channel UHF Wireless Microphone System
- ✔ Channels: 4
- ✔ Wireless technology: UHF
- ✔ Frequencies: Fixed: 541.9, 546.3, 561.6, and 568.65 MHz
Difficulty: Beginner | Time: 30-60 minutes
What You’ll Need
Tools & Materials:
- Wireless microphone and its matching receiver
- Fresh batteries or charged rechargeable batteries
- Audio cable that matches the receiver output and mixer, speaker, or recorder input
- Mixer, powered speaker, audio interface, or recording device
- Headphones or monitoring speakers
- Microphone stand or clip, if needed
Knowledge:
- How to power on the audio equipment
- How to identify a microphone-level or line-level input on your mixer or speaker
- How to adjust input gain and output volume
Check that the transmitter and receiver are designed to work together and are legal to use in your location. Wireless frequency rules vary by country and can change. Read the manufacturer’s instructions for frequency selection, antenna placement, and pairing; menu names differ between models.
Phenyx Pro PTU-7000-4H 4-Channel UHF Wireless Microphone System
For a group that needs four handheld microphones and expects to adapt to different venues, the PTU-7000-4H is the strongest all-round fit in this lineup. Its auto scan searches for a usable frequency, and IR sync helps pair microphones with the receiver. That gives an operator more setup flexibility than the fixed-frequency PTU-5000-4H, though it still takes coordination to run multiple compatible systems together.Its connection options are another point of difference: four separate XLR outputs let a mixer handle each microphone independently, while a mixed 1/4-inch output offers a simpler route to compatible equipment. The stated range reaches 328 feet line of sight, but walls, interference, and venue layout can reduce practical coverage. With four channels and rack-mount hardware, this system is best suited to an installed or frequently used PA setup; smaller two-person events may not need its extra capacity.
Pros:
- Four handheld microphones support group vocals and event hosting.
- Auto scan and IR sync streamline frequency selection and pairing.
- Four individual XLR outputs and one mixed 1/4-inch output suit varied audio setups.
- Rack hardware, a metal receiver, and microphone mute controls support organized operation.
Cons:
- The stated 328-foot range is line of sight and varies with venue conditions.
- Using multiple compatible systems requires frequency coordination.
- Its four-microphone capacity and rack hardware may exceed the needs of a simple two-person setup.
Best for: Small venues, event hosts, and performers who need four microphones and want individual mixer control with adjustable frequencies.
Not ideal for: Buyers who need only two microphones, want a system requiring minimal frequency coordination, or cannot confirm that the 530–580 MHz band is suitable in their region.
Bottom line: Choose the PTU-7000-4H when four microphones, adjustable frequencies, and separate mixer channels matter more than the simplest possible setup.
“Choose the PTU-7000-4H when four microphones, adjustable frequencies, and separate mixer channels matter more than the simplest possible setup.”
Phenyx Pro PTU-71-2H Dual UHF Wireless Handheld Microphone System
When two people need wireless handheld microphones, the PTU-71-2H avoids the bulk and unused channels of the four-microphone systems. Each of its two channels has 100 selectable frequencies, and the receiver’s auto scan and IR synchronization help with setup. That makes it more adjustable than the fixed-frequency PTU-5000-4H, although it cannot accommodate as many simultaneous microphones as either four-channel model.Cardioid pickup is intended to focus on a speaker’s voice and reduce sound arriving from other directions, a useful match for public speaking, karaoke, or small performances. The listed range is up to 328 feet line of sight; treat that as a best-case figure, especially in a crowded venue. Check the specified frequency bands against regional requirements before buying, since frequency selection within the system does not guarantee suitability everywhere. If the event needs four speakers or independent mixer channels, the PTU-7000-4H is a better match.
Pros:
- Two handheld microphones suit common duo and presentation setups.
- 100 selectable frequencies per channel provide adjustment options.
- Auto scan and IR sync can simplify finding and pairing frequencies.
- Cardioid microphones are designed for focused vocal pickup.
Cons:
- Two channels cannot serve a four-person group like the PTU-7000-4H or PTU-5000-4H.
- The listed operating range depends on a clear line of sight.
- Specified frequency bands may not be suitable in every region.
Best for: Duos, presenters, karaoke hosts, and small events needing two handheld mics with selectable frequencies.
Not ideal for: Groups needing more than two simultaneous microphones, or buyers who cannot verify regional compatibility for the listed frequency bands.
Bottom line: Pick the PTU-71-2H for a two-microphone setup where frequency selection matters more than having four channels.
“Pick the PTU-71-2H for a two-microphone setup where frequency selection matters more than having four channels.”
Phenyx Pro PTU-5000-4H 4-Channel UHF Wireless Microphone System
The PTU-5000-4H puts four handheld microphones in one system with individual receiver volume controls and four XLR outputs. For a fixed installation or recurring group event where the frequencies work well in advance, that can make it a direct way to equip four speakers. Compared with the PTU-7000-4H, however, the PTU-5000-4H uses fixed frequencies, so it offers less flexibility if the venue has interference or the setup changes.The receiver’s four XLR outputs allow separate connections to a mixer, while its 6.35 mm connection offers another route to compatible gear. The system does not itself provide sound output: an amplifier or speaker is required. Its stated range reaches 260 feet, below the line-of-sight figures listed for the other two picks, and it is not intended for multi-set operation. It makes sense for a known four-mic setup with suitable sound equipment; buyers who need frequency adjustment should consider the PTU-7000-4H, while two-person events can avoid the extra channels with the PTU-71-2H.
Pros:
- Four handheld microphones cover group vocals and multi-speaker events.
- Individual volume controls support quick level adjustments.
- Four XLR outputs allow separate connections to an audio mixer.
- Metal receiver and included antennas support a straightforward installation.
Cons:
- Fixed frequencies offer less adjustment than the PTU-7000-4H and PTU-71-2H.
- An amplifier or speaker is required for sound output.
- Not intended for multi-set operation; stated range is up to 260 feet.
Best for: Schools, community groups, and venues that need four microphones on known frequencies and already have a PA, mixer, amplifier, or compatible speaker.
Not ideal for: Buyers who need adjustable frequencies, plan to operate multiple sets together, lack external sound equipment, or want the longest stated range in this comparison.
Bottom line: Choose the PTU-5000-4H for four microphones on a compatible, established PA setup where fixed frequencies are acceptable.
“Choose the PTU-5000-4H for four microphones on a compatible, established PA setup where fixed frequencies are acceptable.”
As an Amazon Associate we earn from qualifying purchases.
Before You Start
Choose a setup location with access to the receiver, audio system, and power. Keep the receiver in view of the microphone’s transmitter when possible, and place it away from large metal objects, Wi-Fi routers, and other radio equipment. Do not assume that a frequency used at a previous venue will be clear at the current one.
Keep the speaker volume low while connecting equipment. Connecting with a high level can cause a sudden loud burst. If you are setting up several wireless microphones, prepare and test them one at a time, following the manufacturer’s coordination instructions.
Step-by-Step Instructions
Step 1: Check the system and prepare power
Confirm that the microphone transmitter and receiver are a matching set. Inspect the cable, antennae, battery compartment, and connectors for damage. Install fresh batteries or charge the transmitter and receiver if they use rechargeable power. Turn off the transmitter, receiver, mixer, and speaker before making audio connections.
Tip: Use batteries of the type and orientation printed in the compartment. A low battery can cause a microphone to shut off or behave erratically during use.
Check: The transmitter and receiver are compatible, undamaged, and ready to power on.
Step 2: Place the receiver and antennas
Put the receiver on a stable surface near the mixer or speaker, with its front panel visible. Extend or attach its antennas as the manufacturer directs. For two antennas, position them at an angle from each other if the model instructions allow it. Keep the receiver in a clear path to where you will speak or perform.
Tip: Avoid placing the receiver inside a closed cabinet, behind a metal rack, or directly beside a Wi-Fi router. Obstacles and nearby electronics can weaken or disrupt the radio signal.
Check: The antennas are attached and the receiver has a clear, practical line of sight to the intended microphone area.
Step 3: Connect the receiver to the audio system
With the audio system turned down and powered off, connect the receiver’s audio output to a suitable input on the mixer, powered speaker, interface, or recorder. Use the cable and output recommended in the equipment manuals. If the receiver offers both microphone-level and line-level outputs, choose the one that matches the input. Connect the receiver’s power supply if required.
Tip: Do not connect a line-level output to an input that cannot accept it without checking the equipment instructions. A level mismatch can cause distortion or very low sound.
Check: The audio cable is firmly seated at both ends, and you know which mixer or device channel receives the microphone.
Step 4: Choose a clear frequency and pair the microphone
Power on the receiver and consult its instructions to scan for an available channel or frequency. Select a clear option, then set the transmitter to the same channel using the receiver’s sync feature or the manual pairing procedure. If there is no scan function, follow the manufacturer’s channel-selection guidance and check for local frequency restrictions.
Tip: Turn off other transmitters in the same system while scanning unless the manufacturer’s instructions say otherwise. With multiple microphones, use the system’s frequency coordination process to select compatible channels and avoid interference between transmitters.
Check: The receiver identifies the transmitter, and its signal or radio-frequency indicator responds when the microphone is on.
Step 5: Set a safe starting audio level
Power on the mixer or speaker at a low volume, then power on the microphone transmitter. Unmute the receiver and the appropriate mixer channel. Set the channel fader or speaker level low, then speak into the microphone while gradually raising the channel gain until the meter shows a healthy signal without reaching its clipping or peak indicator. Bring up the listening volume slowly.
Tip: Hold a handheld microphone as intended for use, or position a headset or lavalier as described by its maker. Do not cup the microphone grille; your hand can change its sound and cause feedback.
Check: Your voice is audible through the system, and channel meters show signal without clipping.
Step 6: Test the whole operating area
Speak or perform at the normal distance and volume, then move through the full area where the microphone will be used. Watch the receiver’s signal and audio indicators as you test. Listen for dropouts, static, hum, and distortion. If the signal weakens, reposition the receiver or antennas and repeat the walk test.
Tip: Test with the room’s usual electronics switched on when practical. People, equipment, and room layout can affect radio reception, so a test beside the receiver alone may not reveal dead spots.
Check: Your voice stays clear throughout the intended area, with no repeated dropouts or sudden level changes.
Step 7: Save the setup and prepare for use
Record the selected channel or frequency, label the receiver and transmitter if several sets are in use, and secure the receiver and cables where they will not be pulled or tripped over. Confirm that the transmitter has enough battery power for the session. Set a sensible channel level and mute the microphone when it is not in use.
Tip: Keep a spare set of compatible batteries or a charged transmitter available for longer sessions. Follow the manufacturer’s guidance for charging and battery storage.
Check: The equipment is stable, the chosen frequency is recorded, and the microphone can be used without disturbing the audio connections.
Common Mistakes to Avoid
- Using a frequency that is occupied or restricted at the venue. — Scan for a clear channel at the location and check local rules and the system’s frequency guidance before use.
- Setting the gain too high, which makes the audio distort or feed back. — Start with low levels, raise the input gain while speaking, and stop before the meter clips. Keep the microphone behind the speakers when possible.
- Hiding the receiver or placing it near obstructions and radio equipment. — Place it in a visible, open position with antennas attached and a clear path to the microphone area.
- Forgetting to test where the microphone will actually be used. — Walk the full operating area at normal speaking distance and listen for dropouts before the session begins.
Troubleshooting
Problem: The receiver shows no signal from the microphone.
Solution: Check that both units are powered on, the transmitter is unmuted, and both use the same channel or frequency. Repeat the pairing procedure and check the transmitter batteries.
Problem: The sound cuts out in part of the room.
Solution: Move the receiver into a clearer position, extend and reposition the antennas, and repeat the walk test. Scan for a clearer frequency if the dropouts continue.
Problem: The microphone signal is too quiet or distorted.
Solution: Confirm that the receiver output matches the audio input type. Raise or lower the mixer input gain while monitoring its meter, and check that the transmitter is not muted or set to an unsuitable sensitivity level.
Problem: A loud squeal or ringing sound occurs.
Solution: Lower the speaker or microphone channel level, move the microphone farther from the speakers, and point it away from them. Increase volume gradually after the feedback stops.
What Success Looks Like
The receiver recognizes the transmitter, the mixer or speaker shows a clean audio signal without clipping, and speech remains clear while you move through the intended operating area. You can repeat the setup using the recorded frequency and the documented connections.
Next Steps
Mute and power down the transmitter after use, then turn down the audio system before disconnecting cables. Store the microphone and receiver in a dry, protected place. Remove disposable batteries if the equipment will be stored for an extended period, following the manufacturer’s instructions. At a new venue or after a system change, scan and test the operating area again.
Frequently Asked Questions
Can I use any wireless microphone with any receiver?
No. The transmitter and receiver must be compatible in frequency range and system design. Check the model documentation or manufacturer’s compatibility list before connecting them.
How far can I stand from the receiver?
Range depends on the system, antenna placement, obstructions, and radio activity at the venue. Use the manufacturer’s range information as a guide, then walk-test the actual area before use.
Can I operate several wireless microphones at once?
Often, but the systems need compatible frequency coordination. Use the manufacturer’s coordination instructions, scan at the venue, and test every microphone together before the session.
Why does the microphone work during setup but drop out later?
The transmitter battery may be low, someone may have changed a channel, or people and equipment may block the radio path. Check the battery and channel, then test with the room in its normal arrangement.