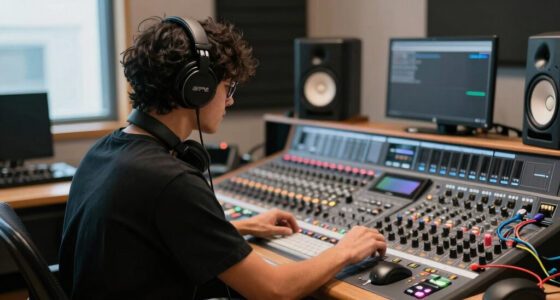

Set up a wireless microphone system by matching its microphone and receiver, finding a usable radio channel, connecting the receiver to a mixer or powered speaker, and testing the singer’s voice. This guide is for beginner singers, performers, and small-venue operators; allow 30-60 minutes, including a full sound check. You will finish with a reliable signal, a comfortable vocal level, and a plan for avoiding dropouts during the performance.

Get audio and creator gear delivered free with Prime
- Fast, free delivery on millions of items
- Prime Video, Amazon Music and more included
- Member-only deals all year
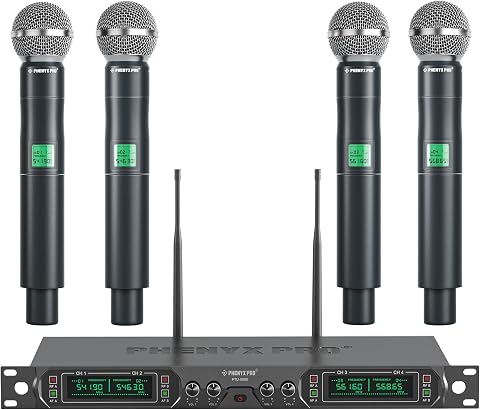
Phenyx Pro PTU-5000-4H 4-Channel UHF Wireless Microphone System
- ✔ Channels: 4
- ✔ Microphones: 4 handheld microphones
- ✔ Pickup pattern: Dynamic cardioid

MicrocKing 4-Channel UHF Wireless Microphone System with Four Handheld Microphones
- ✔ Channels: 4
- ✔ Microphones: 4 handheld UHF microphones
- ✔ Pickup pattern: Cardioid moving coil
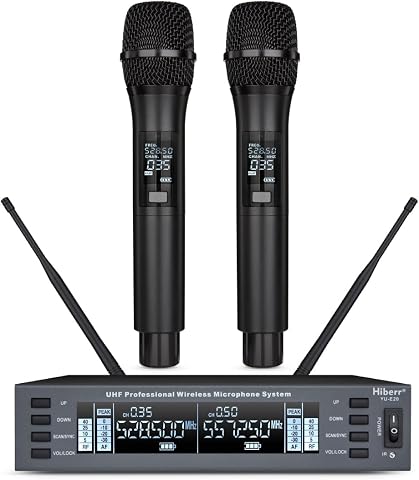
Hiberr YU-E20 Dual-Channel UHF Wireless Handheld Microphone System
- ✔ Channels: 2
- ✔ Microphones: 2 handheld microphones
- ✔ Wireless type: UHF; 520–569.750 MHz listed
Difficulty: Beginner | Time: 30-60 minutes
What You’ll Need
Tools & Materials:
- Wireless microphone transmitter and its matching receiver
- Fresh batteries or a fully charged transmitter
- Audio cable compatible with the receiver output and mixer or speaker input
- Mixer or powered speaker
- Headphones or a monitor speaker for checking sound
- Manufacturer manuals for frequency, pairing, and connection details
Knowledge:
- Basic ability to connect an audio cable
- Ability to identify a mixer or speaker input and adjust its level
- Basic understanding of microphone distance and speaking or singing at performance volume
Check that the wireless system is legal to operate in your location and that its frequency range is supported there. Some frequency bands are restricted or reassigned. Confirm that the transmitter and receiver are designed to work together; units from different systems may not pair even if they look alike. Set aside time to test from the places where the singer will perform.
Phenyx Pro PTU-5000-4H 4-Channel UHF Wireless Microphone System
For a vocal group that needs four handheld microphones at once, the Phenyx Pro PTU-5000-4H is the most clearly specified fit in this lineup. Its dynamic cardioid cartridges are intended to emphasize the singer in front of each microphone while reducing pickup from other directions, a useful design aim when several voices share a stage. The receiver offers individual volume controls and four XLR outputs, so each channel can be routed separately to a mixer instead of being combined at the receiver.Compared with MicrocKing, Phenyx includes eight AA batteries and lists the four operating frequencies, but its stated range is shorter: up to 260 feet versus MicrocKing’s claimed 400 feet. Those figures alone do not establish real-world reliability. Phenyx’s key compromise is its fixed frequencies, and the product is not intended for multi-set operation. It also needs an amplifier or speaker system; the receiver does not produce sound by itself. For a group using one set and a mixer, the channel layout is more straightforward than Hiberr’s two-microphone arrangement.
Pros:
- Four handheld microphones and four receiver channels support group vocals.
- Four XLR outputs allow channels to be routed separately.
- Individual volume controls and an LCD frequency display aid basic receiver adjustments.
- Eight AA batteries are included, with a stated battery life of up to eight hours.
Cons:
- Fixed frequencies limit adjustment when interference is a concern.
- Not intended for use with multiple sets, and an amplifier or speaker is required.
- Its stated range is up to 260 feet, below the other systems’ advertised figures.
Best for: Singing groups or small ensembles that need four separate vocal channels into a mixer and want batteries included.
Not ideal for: Singers who need to change frequencies, coordinate multiple wireless sets, or expect the receiver to power a speaker directly.
Bottom line: For one four-singer setup feeding a mixer, Phenyx Pro offers the clearest balance of channel separation and included essentials, with fixed frequencies as its main limitation.
“For one four-singer setup feeding a mixer, Phenyx Pro offers the clearest balance of channel separation and included essentials, with fixed frequencies as its main limitation.”
MicrocKing 4-Channel UHF Wireless Microphone System with Four Handheld Microphones
MicrocKing is a practical alternative for singers who need four handheld microphones but want more than one way to connect the receiver. Four XLR outputs support separate connections to a mixer, while the additional 1/4-inch output can suit a compatible input on a mixer or other sound equipment. Individual volume controls and an LCD display make the receiver more manageable for group performances than a basic combined-output setup.Its listed cardioid moving-coil microphones and voice compression and expansion are aimed at vocal use, while the metal mesh heads and connectors suggest sturdier touch points. The headline is its claimed range of up to 400 feet, longer on paper than Phenyx Pro’s 260 feet. We would not choose between them on range claims alone, since venue conditions matter. Phenyx has the clearer frequency information and includes batteries; MicrocKing’s batteries are not included, and its note about sharing channels across as many as 40 systems lacks setup detail. That makes it less reassuring for a venue coordinating several wireless sets.
Pros:
- Four handheld microphones support group singing.
- Four XLR outputs plus a 1/4-inch output provide useful receiver connection choices.
- Individual volume controls and an LCD display simplify channel adjustment.
- Metal mesh microphone heads and metal connectors add sturdier contact surfaces.
Cons:
- Batteries are not included.
- The claimed multi-system channel-sharing capability is not explained in detail.
- The stated range is a manufacturer claim and may vary with venue conditions.
Best for: Bands, karaoke hosts, and vocal groups that need four microphones and want both XLR and 1/4-inch connection options.
Not ideal for: Buyers who want batteries in the box or need clear instructions for coordinating several wireless systems.
Bottom line: Choose MicrocKing over Phenyx Pro when its extra 1/4-inch output matters more than included batteries and clearly listed fixed frequencies.
“Choose MicrocKing over Phenyx Pro when its extra 1/4-inch output matters more than included batteries and clearly listed fixed frequencies.”
Hiberr YU-E20 Dual-Channel UHF Wireless Handheld Microphone System
Hiberr takes a different approach from the four-microphone Phenyx Pro and MicrocKing: it is built for two singers sharing a receiver, with one-touch frequency scanning as its clearest advantage. For a duo moving between rehearsals or small venues, scanning can make initial setup less involved than working from fixed frequency information. The system includes two handheld microphones, a dynamic capsule, and both 6.35 mm and XLR connectors, covering common ways to feed compatible sound equipment.The listing states an operating range of over 328 feet and 8–10 hours of battery life, with four AA batteries required. Those claims make it look convenient for longer sessions, though actual results will depend on conditions and use. The omnidirectional pickup is a meaningful distinction from the cardioid microphones listed for the two four-channel systems: it may capture sound from more directions, which can also make surrounding stage sound more relevant. We would favor Phenyx or MicrocKing for a four-voice arrangement and separate channel outputs. Hiberr’s listing also gives conflicting signal-to-noise figures, so that specification is less dependable as a comparison point.
Pros:
- Two handheld microphones and a dual-channel receiver suit duets.
- One-touch frequency scanning can simplify initial setup.
- Includes both 6.35 mm and XLR connector options.
- Advertised battery life is 8–10 hours.
Cons:
- Four AA batteries are required.
- The listed signal-to-noise ratio conflicts between the description and specifications.
- Omnidirectional pickup differs from the cardioid pattern of the four-channel alternatives.
Best for: Duos, karaoke singers, and performers who value simple scanning and need two handheld wireless microphones.
Not ideal for: Four-person groups, buyers who require four separate XLR outputs, or shoppers prioritizing consistent published audio specifications.
Bottom line: Hiberr is the convenient duo pick when scanning matters more than adding microphones or having four separately routed vocal channels.
“Hiberr is the convenient duo pick when scanning matters more than adding microphones or having four separately routed vocal channels.”
As an Amazon Associate we earn from qualifying purchases.
Before You Start
Keep the transmitter off while connecting cables and setting initial mixer levels. Turn speaker or amplifier levels down before powering equipment to reduce pops. Place the receiver where it has a clear view of the singer and away from large metal objects, routers, and other radio equipment where possible. If you are using more than one wireless system, coordinate frequencies using the manufacturer’s guidance or receiver scan tools; choosing the same channel by guesswork can cause interference.
Step-by-Step Instructions
Step 1: Check the system and power it
Confirm that the transmitter and receiver labels identify them as parts of the same system. Install fresh batteries or charge the transmitter as directed. Connect the receiver’s power supply, then turn on the receiver while the transmitter remains off. Set the receiver output level to its recommended starting point from the manual.
Tip: Do not mix rechargeable and disposable battery types in a device that takes more than one battery. Follow the device’s battery instructions.
Check: The receiver display or indicator lights up, and the transmitter has adequate battery power.
Step 2: Choose a clear channel
Scan for an open frequency with the receiver’s scan function, if available. Otherwise, follow the manual’s channel-selection procedure and local frequency guidance. Keep the transmitter off during the scan. Set the receiver to the selected channel, then sync or set the transmitter to the same channel using the specified infrared sync, menu, or switch procedure.
Tip: For multiple microphones, coordinate all channels before the event and leave separation between frequencies according to the system’s instructions.
Check: The transmitter and receiver show the same channel or frequency, and the receiver indicates a radio-frequency signal after you turn on the transmitter.
Step 3: Connect the receiver to the sound system
Connect the receiver audio output to a suitable input with the correct cable while mixer or speaker levels are low. Use a balanced output and input when both are available for a longer cable run. Choose a microphone-level or line-level input setting to match the receiver output, as described in the manuals. Avoid connecting a line-level output to an input already set for a strong signal without checking its level.
Tip: If the mixer has a pad or input sensitivity switch, leave it off initially and engage it only if the input overloads at a low gain setting.
Check: The cable is secure at both ends, and the receiver is connected to the intended mixer or speaker channel.
Step 4: Set a stable receiver position
Place the receiver on a stable surface with its antennas positioned as the manufacturer recommends. Keep antennas unobstructed and apart from one another if the unit has two. Move the receiver closer to the performance area when practical, while keeping it away from the front of the speaker and other strong radio sources.
Tip: Do not coil excess antenna cable tightly or hide the receiver inside a metal rack without suitable external antennas.
Check: The receiver is powered, visible or accessible for monitoring, and has a clear radio path toward the singer’s usual position.
Step 5: Set input gain and vocal level
Turn on the transmitter and speak or sing into the microphone at the volume you expect during the performance. On the mixer, raise the channel gain until the meter reaches a healthy level without entering the red or sounding distorted. Set the channel fader and speaker level for the room, then add only the equalization or effects the performance needs.
Tip: Hold a handheld microphone near the grille, about a hand’s width from the mouth, and keep that distance steady. Do not cup the grille, which can change the tone and cause feedback.
Check: The voice is clear, the mixer does not clip, and the room hears a comfortable level without a loud hum or harsh distortion.
Step 6: Walk-test the performance area
Sing while walking slowly through the entire area where the performer may move, including the edges and any path to the stage. Watch the receiver’s signal indicators and listen for crackles, dropouts, or changes in tone. If the signal weakens, reposition the receiver or antennas and repeat the walk-test before changing channels.
Tip: Keep the transmitter antenna unobstructed as much as the design allows. Avoid gripping an antenna or covering it with the body during the test.
Check: The signal stays steady throughout the singer’s movement area, with no audible dropouts.
Step 7: Save settings and prepare for the performance
Record the selected frequency or channel, receiver output setting, and mixer channel. Mute the channel or turn the system down before switching the transmitter off. Keep spare batteries available and tell the singer how to hold the microphone and where to stand if a problem occurs.
Tip: Power the receiver before the transmitter during setup. At the end, mute the audio channel before switching the transmitter off to prevent handling noise.
Check: You can restore the chosen setup, the microphone is ready with charged power, and the singer knows how to use it.
Common Mistakes to Avoid
- Turning on the transmitter before selecting or syncing the channel. — Scan with the transmitter off, select a channel, then sync the transmitter and confirm the receiver’s signal indicator.
- Setting mixer gain too high to compensate for a weak or distant microphone signal. — Keep the microphone at a consistent singing distance, set gain while singing at performance volume, and watch for clipping.
- Placing the receiver behind metal, inside a closed cabinet, or far from the stage. — Place it in a clear position near the performance area and repeat the walk-test after moving it.
- Assuming any wireless transmitter can pair with any receiver. — Match the system model and frequency range, and check the manufacturer’s pairing instructions before the event.
Troubleshooting
Problem: The receiver shows no radio signal from the microphone.
Solution: Check transmitter power and battery, confirm both units use the same channel, and repeat the sync procedure. If they still do not connect, verify that the transmitter and receiver are compatible.
Problem: The singer hears crackling or short dropouts while moving.
Solution: Repeat the walk-test, move the receiver into a clearer line of sight, reposition its antennas, and scan for a different clear channel if interference persists.
Problem: The receiver shows a signal, but no sound comes through the mixer or speaker.
Solution: Check the audio cable, selected mixer input, mute status, input sensitivity, and channel level. Confirm that the receiver output is connected to the correct input type.
Problem: The vocal sounds distorted or triggers feedback.
Solution: For distortion, lower the mixer input gain or receiver output and check for clipping. For feedback, lower the monitor or speaker level, move the microphone farther from speakers, and avoid pointing its front toward them.
What Success Looks Like
The receiver shows a stable signal from the transmitter, and the singer’s voice comes through the mixer or speaker clearly without clipping, crackling, or feedback. The walk-test passes throughout the performance area. The selected channel and mixer settings are recorded, and the transmitter has enough battery power for the set.
Next Steps
Before each performance, charge or replace the batteries, power up and check the system, confirm that the channel is still clear, and repeat a brief walk-test. After the event, mute the mixer channel before turning off the transmitter, then switch off the receiver and store the microphone and receiver safely. If dropouts continue on several clear channels, check the manuals for antenna placement and compatibility or ask an audio technician to inspect the setup.
Frequently Asked Questions
Can I use a wireless microphone system with any mixer?
Usually, if the receiver output connects to a compatible mixer input and the levels are set correctly. Check the receiver output type and level, then use the matching cable and input setting.
How far can a singer move from the receiver?
Range depends on the system, antenna placement, obstructions, and radio interference. Use the manufacturer’s stated range as a guide, then walk-test the actual performance space.
Why does the microphone work during setup but cut out during the show?
People, equipment, or movement may block the radio path, or another signal may interfere with the channel. Keep the receiver in a clear position and test the full movement area at the venue before the performance.
Should I turn off the transmitter between songs?
Usually, leave it on during a set unless the microphone has a reliable mute switch and you know how to use it. Turning it off can create handling noise or a delay while the system reconnects. Mute the mixer channel first if you need to switch the transmitter off.
Halloween Picks
halloween
As an affiliate, we earn on qualifying purchases.