
To improve your recordings in an untreated room, start by positioning your mic as close to the sound source as possible to cut down on room reflections and ambient noise. Experiment with angling the mic slightly off-axis or to the side of the source to minimize echoes entering the capsule. Use a cardioid or hypercardioid pattern if available, and adjust the distance and angle until you find a clear, natural sound. Keep exploring more tips to elevate your recordings further.
Key Takeaways
- Keep the microphone close to the sound source (6-12 inches) to minimize room reflections.
- Angle the mic off-axis and use directional patterns like cardioid to reduce ambient sound pickup.
- Position the mic slightly to the side of the source to diminish direct reflections and enhance tone.
- Experiment with different distances and angles to find the clearest, most natural sound.
- Combine strategic mic placement with basic acoustic treatments, like blankets or foam panels, for better results.
Recording in an untreated room can be challenging because reflections and echoes often color your recordings with unwanted noise. Without proper room acoustic treatment, sound waves bounce off walls, ceilings, and floors, creating a muddled and less clear audio. To improve your recordings, you need to focus on effective microphone placement techniques that help minimize these issues. While investing in acoustic panels or bass traps can markedly help, you can also make immediate improvements with strategic mic positioning.
Untreated rooms cause reflections and echoes; strategic microphone placement can significantly improve your recordings instantly.
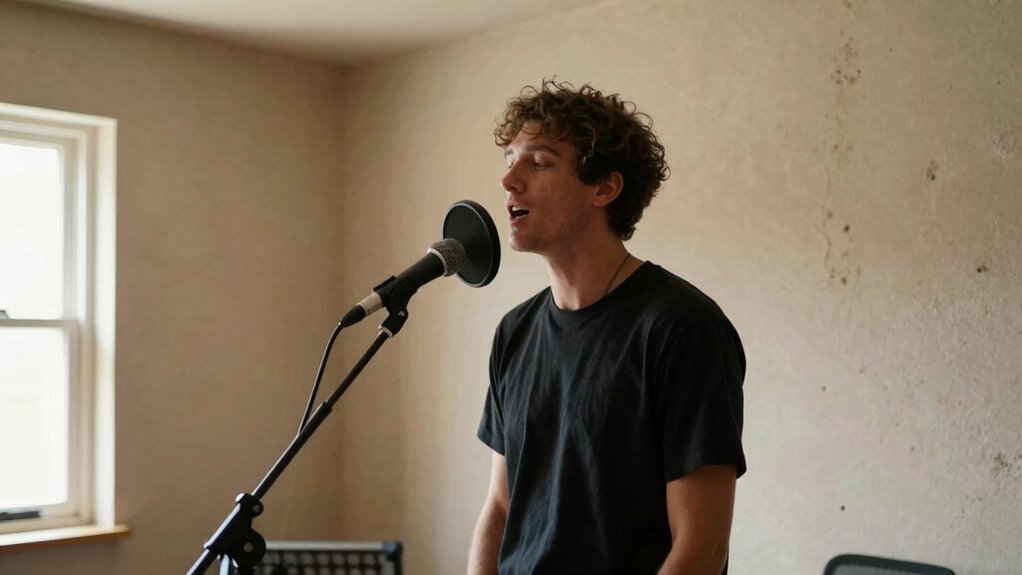
Start by understanding how your microphone interacts with the space. Keep it close to the source—your voice or instrument—to reduce the room’s influence. The closer you place the mic, the less room sound it picks up, which is especially helpful in untreated environments. This is one of the simplest yet most effective microphone placement techniques. For vocals, positioning the mic about six to twelve inches away from your mouth generally captures a warm, full sound while cutting down on room reflections. If you’re recording an instrument, experiment with distances—sometimes moving the mic slightly closer or further can make a notable difference in clarity.
Angle your microphone to minimize the capture of reflections. Instead of pointing it directly at the sound source, try angling it slightly off-axis. This reduces the amount of room sound that enters the mic capsule, especially if you’re using a cardioid or hypercardioid pickup pattern. For example, pointing the mic just to the side of your mouth or instrument helps block unwanted echoes while still capturing a natural, balanced tone. You can also use the proximity effect to your advantage—getting closer to the mic boosts bass response and further reduces room noise, but be mindful of plosives and sibilance.
In addition to positioning, consider the effect of your environment on sound quality. Implementing some basic room acoustic treatment, like placing blankets or foam panels strategically, can markedly reduce reflections. However, if you’re limited on time or budget, focusing on microphone placement techniques provides an immediate way to improve your recordings. Experiment with different distances and angles until you find the sweet spot where your sound is clear, warm, and free from undesirable echoes. Understanding your room acoustics and applying simple solutions can make a significant difference in your sound quality. Over time, combining these methods with proper acoustic treatment will elevate your recordings to professional quality, even in untreated spaces.
Frequently Asked Questions
How Can I Reduce Echo Without Acoustic Treatment?
To reduce echo without acoustic treatment, you should control your room’s dimensions and add sound absorption. Use furniture, rugs, or thick curtains to absorb sound waves and minimize reflections. Position your microphone closer to your source, which helps capture direct sound and reduces room reverberations. Avoid parallel walls when possible, as they create standing waves. These simple adjustments can markedly improve your recording quality in untreated spaces.
What Are the Best Microphone Types for Untreated Rooms?
Think of microphone types as your shield against untreated room issues. For untreated rooms, dynamic mics are your best bet—they’re like a thick blanket, minimizing room noise and echo. Condenser mics, while sensitive, can pick up more room sound, so use them carefully. Shotgun microphones focus sound from a distance, reducing room reflections. Choose the right type based on your environment, and you’ll get clearer recordings despite the untreated space.
How Do Room Size and Shape Affect Recording Quality?
Your room size and shape substantially impact recording quality. Larger rooms can cause echo and reverberation, muddying your sound, while smaller spaces might produce unwanted buildup of reflections. Unusual room shapes, like irregular or angular walls, can lead to shape distortion, affecting sound clarity. To improve recordings, consider how room dimensions influence acoustics and try to position your microphone to minimize these issues, capturing clearer, more balanced sound.
Can Portable Acoustic Panels Improve Sound Without Permanent Changes?
Yes, portable acoustic panels can improve sound without permanent changes. They help by enhancing sound absorption, reducing echo, and minimizing unwanted reflections in your space. You can easily set them up around your recording area, making your environment more acoustically friendly. This flexibility allows you to optimize sound quality quickly and without any major renovations, giving you a practical solution for better recordings in untreated rooms.
What Software Tools Help Minimize Room Reflections During Editing?
You can use acoustic simulation tools and editing plugins to minimize room reflections during editing. Acoustic simulation software helps you model your space and understand reflection issues, guiding your edits. Editing plugins like de-reverb or noise reduction tools effectively reduce reflections post-recording. By applying these tools, you improve sound clarity and create a more studio-like quality, even if your room isn’t acoustically treated.
Conclusion
So, next time you record in an untreated room, remember that your microphone’s distance and angle can work wonders—despite your efforts to treat the space. Ironically, all those tricks might be more about fooling your ears than fixing the room’s flaws. Sometimes, the best sound comes from embracing the imperfections and playing the room’s quirks to your advantage. After all, who needs a perfect space when you’ve got clever mic placement?